Monday, November 8, 2010

DAY ???? - or is it "DAZE"

I just want all of my loyal followers to know that I have not stopped the project.  Yes, I've had some weather setbacks (like today), and also away for some days (election day, security show in NY, etc) but I HAVE been chipping away.

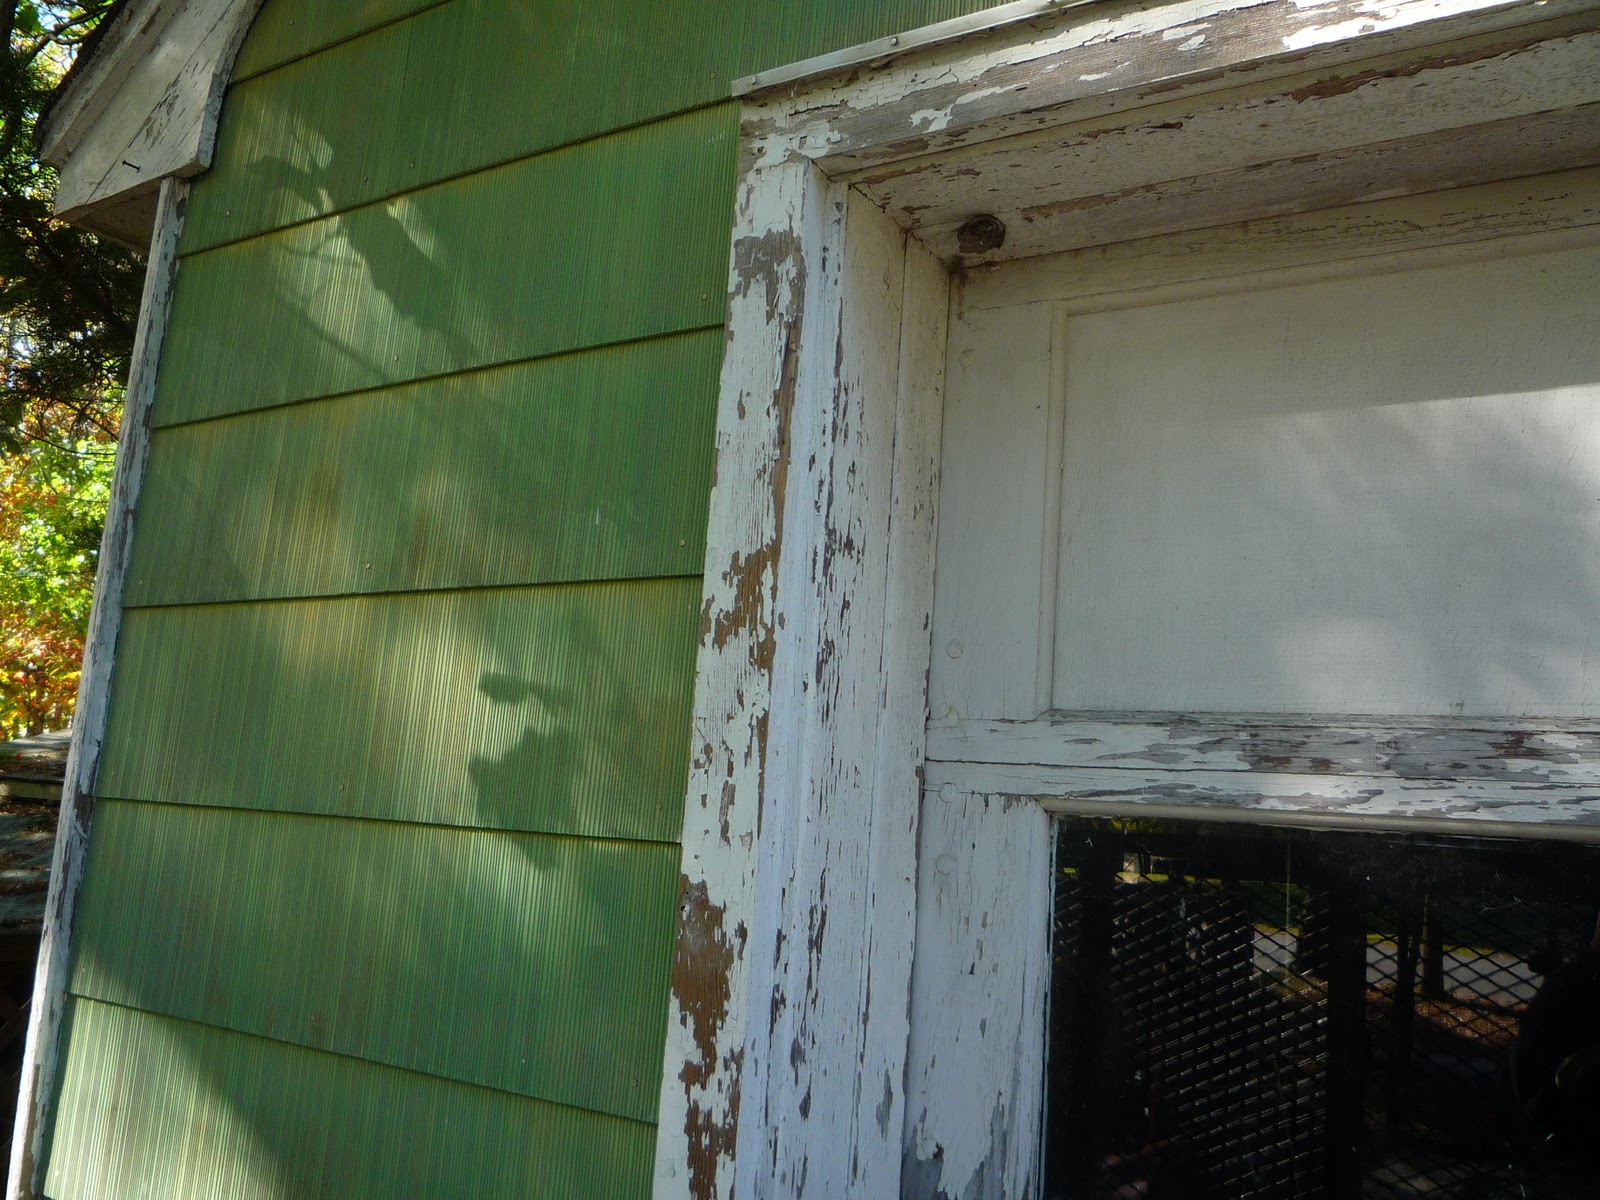
Yesterday I painted two sides of the Laundry Room extension and scraped the roof trim and corner boards. Sorry, didn't take 'after" pictures yet.


.  I've also painted the back of the house where the bedroom and bathroom are. First, though, let me show you what it USED to look like... including a pic of the old shower that was installed on the wall.  There used to be a pool, so at that time it made sense to have one there.  Check it out..............


See that algae or whatever it is on the bottom shingles?  Every shingle had to be scrubbed first.
Here it is after removing the plumbing and then painting..............


I still have to do something with the Bilco door....... I'm thinking of sandblasting it before painting.  Also, I left the stubs of the plumbing there, just in case someday I or future owners would need a faucet or something there.  I'll cap them and then paint them and you won't even notice them.

Also, I've decided to put shutters on all the back windows.  You might say, "Why?  Nobody will see them!"  Well, the truth is, that my neighbor has been looking at this eyesore for ten years.  I seriously think that I am the reason he had his house on the market for over three years and couldn't sell it.  Therefore it is my gesture of peace to do it.

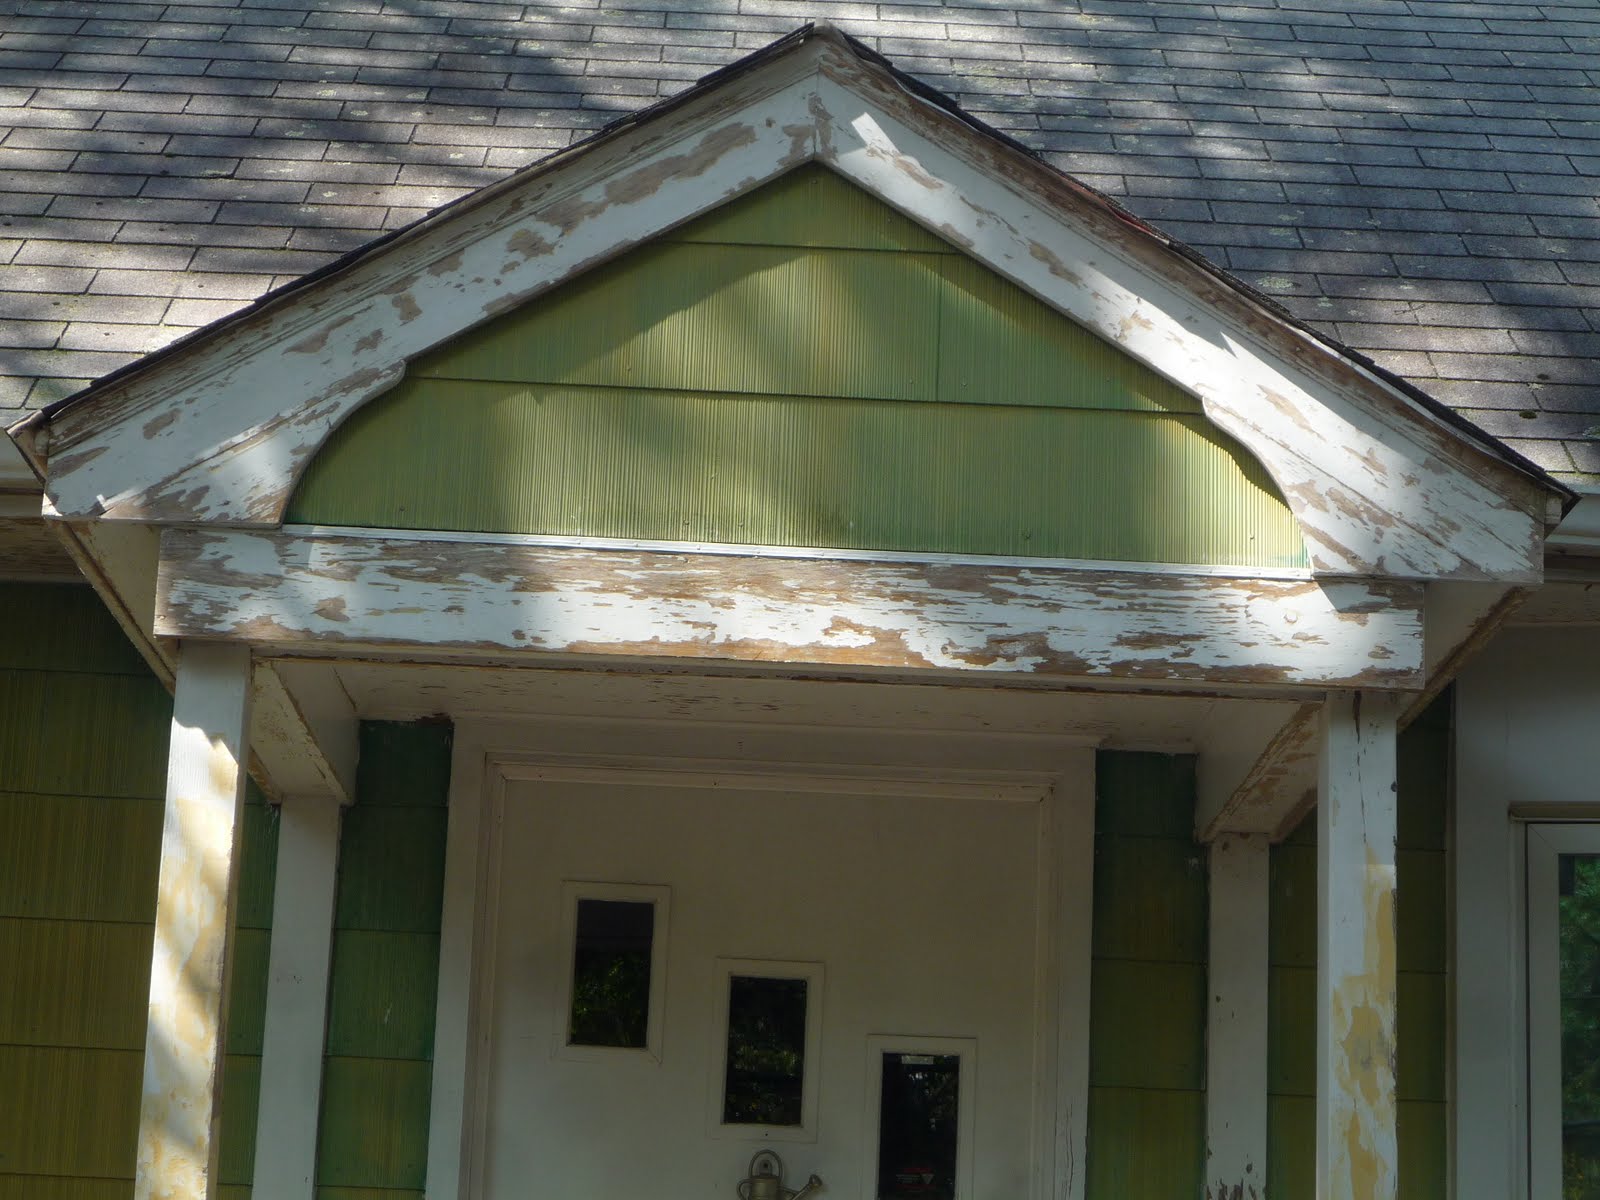
 I also painted the trim on the lake side wall.

I haven't worked on the upper section yet as I have to replace that window.  Don't worry, I'm also going to fix that attic vent!
 
I thought I'd show you the view from those windows in the above picture.  It's especially pretty in the fall as somehow the trees take on a goldish hue.  In fact, it's most prominent when my house falls into the shade of the sunset, but the other side of the lake is still bathed in sunlight.  Take a look.


TANGENT~~~~~~~~~~~~~~

For all of you bachelors (and bachelorettes) out there who want to cook a cheap meal quick, here's one that's always been a crowdpleaser.  In fact, I made it tonight.  It's a pasta and veggie dish that uses one pot.  I learned this from She Who Casts No Reflection, but you, the living, can enjoy it too.  It looks like this:


You will need:

1 large pot (I think they call it a 4qt pot?)
1 box pasta of choice (I like the Rotelli, but you could use Penne, Farfalle, etc.  I wouldn't suggest Spaghetti, though)
Veggies ... I normally use broccoli and carrots, but tonight I added variety AND saved time
5oz Canola oil  approx.
butter  1/2 to 1 stick
fresh garlic cloves  4 or 5  WHEW!!

Here's the basics:


What happened is that I went to Costco tonight to finally buy some food, and I came across those Normandy Vegetable Blend frozen vegetables.  It's all the stuff I like - broccoli, cauliflower, carrots, and yellow carrots.  Produce Guru Valerie Inzinna I think told me that many times frozen vegetables are better than if you buy them at the grocery as they are frozen right after picking, so I don't feel guilty about using them.

This is so simple that it's almost impossible to screw up.  First, fill pot about 1/2 way with water and bring to boil.

Next, dump in veggies and cook to taste (these took about 12 minutes.  Alternately you can do what I normally have done before today and use "fresh" broccoli and carrots.  If you do that,   cut the carrots in chunks and THROW THE CARROTS IN FIRST!!!  When they are still firm but you think they are just a little too tough to take out yet, throw in the broccoli (that you've cut into bitesize pieces) with the carrots as they don't take long.

When the veggies are done DON'T DUMP THE WATER OUT!!! Just scoop out the veggies into a colander.

Next, use that good nutricious water and put in your pasta and cook normally.

When pasta is done, NOW you dump everything into a colander and wipe out the remaining water from the pot.
Put the pot back on the stove and add your oil and butter.  Oh, I forgot to mention to dice up your garlic cloves.

When the butter/oil mixture is hot throw in the garlic and saute.  MMMMMMMM! it smells SO good!

After literally a minute or so it's ready.  Remove from heat, dump in the pasta and veggies and mix thoroughly, making sure that garlic/oil/butter magic is covering everything. 

So what are you waiting for!!  Dump some on a plate and start eating!!

I put cheese on mine.  I think Val will agree though  that we need some protein in there.  If you use this as a side dish that would be no problem, but as a main dish I guess I should have added some chicken pieces or that seitan stuff mentioned elsewhere in another blog .  Any other suggestions would be appreciated. From beginning to end this is a less than 30 minute meal.  Rachel Ray would be proud.

A glass (or two) of Port afterwards also enhances the meal, as I'm doing right now (any protein in Port?)  Bon Appetit!!!

END TANGENT~~~~~~~~~~~~

Monday, October 25, 2010

DAY XIX? ~ It's all becoming a blur

Don't look for days XVII or XVIII because they're mixed in here.  First of all, in my defense, I haven't worked on the house Tues thru Friday as I was in Rhode Island doing training to become a FEMA inspector.  I've done everything - paperwork, tests, etc.  The only thing left is the background check.  They took my fingerprints at the seminar and will send them to the FBI.  If they come back "favorable" then I just have to submit a sh*tload of paperwork, and then I will be deployable..  hahaha, I originally typed "deplorable".... Hmm, maybe there's something to that.  Anyway, in the few days before today I finished painting the trim and completed the painting of the driveway side wall.

I thought the next logical step would be to do the garage, as that's very visible (check out that snazzy basketball net!).  Even if I only did the front it would give the illusion that the rest was done.  The only thing I've accomplished so far by starting to paint is to highlight how crappy the rest of the house looks!!!


Anyway, I went to Home Depot yesterday and spent $322 on gutters for the front of the house, and trim for the garage overhead door.  My plan was to remove the existing rotted wood around the door and replace it with a synthetic white wood product and my problems would be over.   NOT SO!!!!  Oh no.  When I removed the rotted wood what did I find?  MORE rotted wood beneath it!!!  Now a little project has become a major disaster.   Gee, first time THAT's ever happened. 

 I'm really scratching my head over this one.  Do I just cover up all the damage as if it wasn't there and let the next owners worry about it?  When I took off the top trim I found thousands of ants all of the sudden very agitated and disturbed that their cozy little home disappeared.  I guess that's what it feels like when a hurricane blows your house away.  My big problem now is that the top wood is actually two 2 x 12's which form the header of the door.  Removing that is going to be a real effort so I'm thinking of getting professional help.  Also going to call in an exterminator to get an opinion on what to do.  If I DO have to replace the header I'm going to heighten the door opening to 8ft instead of the present 7ft, so I can get my gyroplane in there.  That would solve a lot of my problems.

So after pondering this situation for at least an hour I did what any self respecting procrastinator would do ..... packed everything up and called it a day.

Sunday, October 17, 2010

DAY XVI ~ Still no Camera!

Still on driveway side wall.  Painted 3/4 of the wall!   YAY! Diane came over to help.  What that does is to totally distract me from I'M doing and now I have to become a supervisor and direct her (or anyone who would ever be fool enough to come help me) on what to do, which., in essence, keeps ME from my work.  Result is LESS work done than if I did it myself.  The only way helpers would work out was if there was a very large area to work on.  You tell them what to do and then they're busy for an hour or two.

Anyway, should be able to finish the wall tomorrow and even take some pictures. 

DAY XIV & XV ~ Quickie

Diane has my camera and I've found that a post without pictures is like air popped popcorn.... very bland and boring, so I'll make this very short (and pick up my camera tonight!).

These last two days I'm still working on the driveway side wall.  As you know I scraped all the trim molding so on day XIV I put on the first coat of primer on the trim, and Day XV I put the coat of good paint on the trim.  Again, what makes it difficult and time consuming is using the scaffold and then setting the ladder on top of the swcaffold.

By the way, it just occured to me that today is actually DAY XVI !, so I'll end this here and move on to the next post to keep up to date.

Wednesday, October 6, 2010

Day XIII ~ Doesn't look like much

,
This was one of those days where you work your butt off and it looks like you did hardly anything.  I washed almost all of the driveway side wall.  It was really scary doing the very tippy top of the peak of the roof area.  I had the ladder extended and sitting on top of the scaffold.

To make me feel a little more secure I went inside and tied a rope to a bed that was just inside the window in the attic, then tied it around the ladder, and then around my waist (you can see it still hanging out of the lower right corner of the top window).  All I could picture was the scaffold tipping over, knocking me off the ladder, and then me looking up from the ground and seeing the ladder on its way down on top of me ...... followed immediately after by the bed!  But, it seemed to work pretty well and was a great psychological help as well. 

So, the day was spent washing the wall and scraping the roof trim.  It's funny, you scrape and scrape at a spot and nothing happens.  Then just for fun you hit it again with the scraper about ten minutes later .... and it almost FALLS off!  I could scrape these things forever and not be done, but it's as good as it's going to get for me.  Let the next owners worry about it (hint hint).

 One other very thankless but yet extremely satisfying job was cleaning my fridge the other day.  I may have already posted about it, but if I didn't here's my cleaning secrets. never before revealed.

The secret is using a solution of some sort of soap ... dishwashing soap, even shampoo will work, in a container of hot water.  I used MelaMagic.  And then add the secret ingredient .... bleach!  Do not substitute anything else for bleach as you want to sanitize as well as clean.

Now, the first thing you MUST do is take absolutely EVERYTHING out of the refrigerator... all food, racks, drawers, shelves, etc.  You can wash these separately in the sink before reinstalling.

Emptying the fridge accomplishes two things:  1) it creates a perfect cleaning area in the fridge.  You can get at EVERY nook and cranny, and 2) it gives you the opportunity to discover and throw out all that crap you've been saving that's in the back of the fridge just taking up space.  You may need a strong stomache for this part but believe me, it's worth it.  Throw out anything expired, spoiled, rotten, or anything even close to an expiration date.

Now, get to work on the fridge.  You should have a scrub brush and sponge. I find it's best to start from the top down (yes, even wash the "roof" of the fridge area).  The excess water will run to the bottom area and help to soak all that crud that has accumulated.... you know, everything you've spilled for the last five years ..... where do you THINK it went, anyway! they haven't come up with a "self cleaning fridge" yet.

Keep  working down the sides, and, finally the bottom.  When you're done you can dry it with a towel and it will shine and smell like brand new!!

Wash the shelves, drawers, and stuff and put those back. 

Lastly the fun part.... Only putting GOOD stuff back in.  It also gives you an opportunity to arrange stuff in some kind of order ... something that hasn"t been done in years either.  When you're done your refrigerator will be the envy of all!  It's amazing how a few cents of cleaner and a little elbow grease will bring you so much pleasure.  Feast your eyes..................
The stuff in the upper right of the top shelf are going to Val's house as they're hers, otherwise look how much room there now is!!  (Oh, and it also helps if you are a bachelor who doesn't cook  nobody ever visits, and never goes shopping.)  So get cracking and get YOUR fridge clean!

Monday, October 4, 2010

FAST UPDATE

Last post was last Wednesday, and now it's the following Monday night.  The weather has been my arch-nemesis, although Saturday was BEAUTIFUL! so I went gyroplaning for the day.  I left the gyro at the airport Saturday night as the forecasts were saying Sunday would be nice too, but that was not the case..... so Sunday I went to the airport and packed everything up, much to my dismay.  (see the little picture just below the blog title?  Click on it and you can watch me do a landing in my gyro.... taken two years ago.) 

Today (Monday) the weather is horrible, so worked inside, then went to Mom's for the afternoon helping her take out air conditioners and stuff, and my sister and her hubby came for dinner.  After dinner we watched some TV and stayed until Dancing With The Stars was over. (I bet you're wishing you were me right now!)

Forecast doesn't look good for rest of week either.

Wednesday, September 29, 2010

DAY XII ~ Grunt Day

Not much to tell today.... washed and scrubbed the driveway side of the house.  Not totally finished but got a lot done.  My good neighbor Ken has loaned me a scaffold.  Doesn't reach all the way to the top but it's a great help. 


I also scraped the roof trim on the left side of the chimney.... and then it was time for more granola bars.

Why I took this picture on an angle I'll never know!  Makes you sick looking at it.

Oh, and I spent a few hours today going to Dianes, putting my riding mower on my trailer, going to Moms and mowing the lawn, then reversing the process because it was kind of nice out. 'Posed to rain later and tomorrow so I thought today would be a good day to do it. 

And in case you think I'm a slacker and took five days off, YOU ARE WRONG, MY FRIEND!! Now the truth can be told.  I was at a "Wings and Wheels" show at Teterboro Airport over the weekend to display my gyroplane.  They invite me because a lot of people have never seen one and it's usually a big hit.


So, I packed up the gyro on the trailer and it was on to Teterboro!!!
I've done static displays before and am always asked the same questions so I had a sign made up to answer these frequently asked questions.  What this has done is not only NOT lowered the amount of questions asked, but now I also have to keep picking it up when the wind blows it over and such. 

I let little kids sit in the gyro and their parents take their picture, but what surprises me the most is that these kids touch EVERYTHING!!!!  I would be scared to death to touch ANY switch on a plane for fear it would start or something, but not these kids. As an extreme example, (which I thought was pretty cruel, but also funny at the same time), two boys around 10 or 12 yrs old came over and they were kind of wise guys.  The first kid gets on and touches everything, then gets off.  The 2nd kid then gets on.  The 1st kid then notices a switch that I have near the throttle that is clearly marked "EJECTION SEAT" in big letters.  Now, the switch is a joke because you CAN'T have an ejection seat because it would blow you right up through the spinning top rotor! But most people don't think of that.

So they ask me what it is and I tell them DO NOT TOUCH IT as it's connected.  Well, as the one kid is sitting in the seat the second kid puts his arm over the switch so the first kid doesn't see, and...... FLIPS THE SWITCH!!!!  Some friend!

It was a long show, but as always, here is the best part of ANY show.........................

The weather was beautiful both days and when all was said and done I packed everything up and went to Kearny to spend some time with a certain Valerie doing the usual.... you know, killing Zombies and stuff. 

OK, that's all for now..... supposed to rain tomorrow but I still have plenty of crap to do inside.

Friday, September 24, 2010

DAY XI ~ Why can't every day be like this!

Started a little earlier today as I'm only working for half a day.  Hey, I have to squeeze a life into this.  Life isn't all work you know!

Everything I did today went perfectly.  Every cut was right on the money, each piece fit perfectly, and even the tough cuts were no problem.  Seems when you have a clear head (no distractions)  your focus is entirely on what you're doing your brain is in optimum working environment. 

So I'm very pleased with how everything came out so far.  Only thing left in the front now is new rain gutters.
Here's a little before and after to show the power of vinyl!!!


Here's a construction question for you..... how did I manage to fasten the J channel underneath the overhang and above the porch roof in that little wedgy space?

Can't get a screwdriver in there, can't get the nail gun in there........

I also pondered this for a while and came up with a no less than brilliant solution.  Answer:  I cut a LARGE plywood spacer board for this area... not just a 2" strip like the rest of area.  Then I cut it as necessary to fit in that space. Then I cut and fitted the J channel in place and made a pencil line on the plywood to mark the J channel placement.

Then I removed the plywood and screwed the J channel to the plywood.  Since the plywood sticks out into an area that I CAN get the nail gun into, I fit the plywood with the J channel on it back into the opening and shot the plywood into place.

So now I have to go out and clean everything up and then hopefully enjoy the weekend.  You do that too. 

Thursday, September 23, 2010

DAY X ~ New Tool Arrives!!

Typical morning ... up at 7am, make water for instant coffee, check email, straighten house up a little ..... wait.. back up a second. .... what's this email?  Don't want to go into details but I was being accused of some things that I had to address immediately.  When I write something critically important (like this blog!) it has to be worded "just so".  That sometimes takes hours but that's the beauty of the written word.  You can work on it until it's right and THEN put it out there, as opposed to just saying something off the cuff or being interrupted in the middle of something.

So, after that was taken care of I got dressed and ventured outside for another fun day.  Takes about 15 minutes to set up my worktable, drag out the ladder and tools, etc. and then get started.

Today I'm working on the front of the house to the RIGHT of the front door.  First I had to do the "J channel" but this was a little trickier as there is a bow window that I have to go around.... lots of angles and stuff.  I don't know why, but I seem to really take pains to get things right, even though many times it's something that will be hidden and no one will ever see.  Most contractors will just slap something up and use caulk to hide any imperfections.

So I agonized and cut and cut again the J going around the window ...   Finally got it done (except for the very end on the left, which I'll do tomorrow).  Next I drilled large holes in the old soffit that I couldn't get a saw into, for venting, then covered them with screening.. Notice that I removed the rotted section of fascia board.  It will be replaced with synthetic board.


I figured I'd salvage the rest of the day so I cut the soffit material and got most of that up.  Again, it took a little time to get the angles right around the window, but luckily I had a summer job years ago installing aluminum siding, so cuts and angles aren't totally foreign to me.


BUT.... the Best part of today was when the UPS driver arrived and brought me my latest tool (and not a moment too soon)  a satellite radio boombox!!

  I found it by accident.  I got an email from Sirius and they had some stuff on special so I couldn't resist.  I was turning on the satellite radio in my truck and turning it up so I could hear it, but the last two days I drained the battery and had to get a jump start.  I'll be working outside a lot so it's perfect. It will make the work go so much smoother. 

What you do is take your satellite radio and dock it into the boombox, and way you to! It has it's own volume and on/off button so you don't even have to touch the radio unit once it's plugged in.

 In fact, right now I brought it in the house.  It's blasting away on my kitchen counter .... I LOVE it!!! And the sound quality is excellent... even has a subwoofer.

I'm listening to Little Steven's Underground Garage (Sirius channel 025). GREEAAAATTT station! That's all for now!

DAY IX ~ the "lost day"


Whew!   I've been working nonstop for like 8 days straight!  So when I got up this morning and it was a beautiful day, I decided to reward myself and do a little flying.  The last flying I did was for my biennial flight review.  Here's a question:  What's the difference between "biennial" and "biannual"?  I'll tell you later.  But anyway I have to do this every so often.  It consists of one hour of ground school .... testing me on rules, regulations, map reading, etc. and then one hour of flying.... maneuvers, navigation, etc.

So I had no problem with the ground school part, but when it came time to get in the plane and fly without a GPS to Hammonton Airport I was a nervous wreck. It's only around 30 air miles away but he (my instructor) threw so many distractions at me that I missed the airport!  I eventually found it, but from that point on I vowed that would NEVER happen to me again. 

Every day since then I have been on what's called a VOR navigation simulator    http://www.relia.net/~george/aviation/sim/  and now feel very confident about the navigation and wanted to try that flight again, so today that's what I did.  Need I tell you that it went flawlessly and when the proper time came I looked down and the airport was right there!

So even though I got to the airport around 9am, did my prep work, did the flight, and when all was said and done I didn't leave Robert J. Miller Airpark until, after 12 noon!

The rest of the afternoon is kind of a blur, but I did manage to get out to work around 4:30pm and farted around until dark.  Oh well, EVERY day can't be a blockbuster!!  (speaking of Blockbuster, did you hear they filed for bankrupcy).  I'm sure it was Netflix that did them in.

Back to work tomorrow!

PS:  Biennial means once every two years.    Biannual means twice a year.

Tuesday, September 21, 2010

Day VIII ~ Soffit TO me!!

Out  of the house by 9am, headed to Mom's house in Toms River to pick up an extension ladder.  You might be asking ..."why would your mother have an extension ladder???".  Answer is ~ how do you get most cool things?  You BORROW them and never give them back!  No, seriously, I think someone did some work for her and never came back for the ladder.  It's been two years now, so I think it's officially ours.

After coffee and donuts and some chit chat, it was off to Allied Supply to pick up the long awaited soffit stuff.  I hate going to these contractor places where everyone there is a contractor but you, and you can almost HEAR them laughing at you in their brains.  I persevered and managed to get what I thought I would need to get started.  I almost fainted when it came to around $225!  I'm probably not getting contractor pricing, that's for sure.


So I paid for the stuff, then went around to the side of the bldg where the warehouse guy took the receipt and disappeared.  About 15 minutes later he came walking out with a long 12' box on his shoulder.  I told him I'd move my truck closer for the rest of the stuff when he said "all your stuff is in this one box" and carried over and put it on my trailer.  


Back home I set up all my stuff again and began the job.  First you have to install what we in the trade call " J Channel". It's called "J channel" because ..... come on, do I have to tell you why?  Anyway, this goes against the house and the soffit slips into it.  The other outer end of the soffit gets nailed to the bottom of the fascia.  There was a slight problem though as I had to mount the J channel lower than expected, due to the 3/8" that the existing fascia board hangs down from the existing soffit. 


Luckily the old soffit material I cut away yesterday was the perfect size to use as a spacer so I ripped pieces 2" wide and nailed them up with my air stapler ... zip zip zip.

Next came mounting the J.  If you notice there are slotted nail holes.  When you nail you don't drive the nail home, but leave it slightly loose so when the vinyl expands and contracts, it will slide in the slot under the nail.   I used nails for the first 3 holes or so, but was getting nowhere.  The nails were 3/4" roofing nails, and they did not go into the wood easily.  The nails were so short that I had to hold them with my needlenose pliers! 

I know when to quit, so I used screws instead, driving them in with my cordless drill.  Worked like a charm.


Next was actually cutting the 12ft soffit strips into 16 3/8" pieces.  To do this I mounted a fine toothed plywood blade backwards in my circular saw and made the first cut...... like butta!  The only problem was that it cut SO easily that it was tough to keep a straight line.  So after figuring out how I wanted the beginning piece to look on the "open side", I mounted the first piece.


After that it was cut a piece, mount it, cut a piece, mount it..... for a while.  Brilliant idea department:  I switched gears and used my table saw, but fed the pieces into the sawblade backwards.  By doing this I really sped up the process.  I would cut three pieces, then mount three pieces, etc.  The last piece where it meets the porch roof fit exactly.  What are de odds of dat?  And so, with the sun beginning to set, the soffit in the first section was done!


Now, the average person would have quit for the day, but not ME!  There was still a speck of daylight left, so I tackled installing the fascia.  I first installed what we PROs call "undersill trim", which is basically a piece of vinyl folded against itself so that you can slip the top of the fascia trim into it.... makes a nice finished edge.  It also helped me when I was trying to mount this 12ft piece of aluminum.

Anyway, there was a tricky cut that had to be done on the left side, but I had done it on a practice piece already, so I transfered the measurements to a new piece of fascia and it fit "like a glove".  Slapped up this first piece and THEN I quit for the night.  In fact, I had to take the last picture with a flash as it was getting so dark out.  Gee, haven't worked this hard since my Key West gig.


One thing about aluminum or vinyl.  It will hide a multitude of sins.  I've seen the biggest piece of crap houses resided and retrimmed, and they look fabulous, but what's underneath would curl your hair.  Not so here, though, in my own defense.  Speaking of Key West and the sun setting, I leave you with one of my favorite pictures, taken at a top secret spot somewhere in the "Lower Keys".  Enjoy.


Monday, September 20, 2010

Day VII ~ swapping paintbrush for hammer


Today's project was working on the front of the house again..... this time the soffits and fascias.  In case those terms are foreign to you, the soffit is the underhang of the roof where it extends past the exterior walls of the house.  Said another way, where the roof overhangs the ends of your house, the bottom side of that overhang is the soffit.

The fascia boards are the roof trim boards the make a "band" around the roof's perimeter.  This is where the rain gutters are fastened, for example. 

I set up all the tools I thought I would need on my little worktable, so here we go.

What I've always wanted to do is to vent the soffits to create an airflow from the soffits up through the roof and then exhaust out of the side gable vents, and now is the perfect time to do it.


What I did first was take my cordless circular saw and saw a line down the inner and outer edges of the soffit, then took my reciprocating saw and connected the two saw cuts together at each end to enable me to remove this inner section.  I left a few inches of soffit wood on each side that I will utilize later. You can see the first piece removed in the picture above.  Interestingly, when I removed this first piece there was a pile of insulation in the left corner, as well as several pine cones falling out of the hole.  I know there were squirrels in the attic before I moved in, and I guess they built a nest in the corner.  I continued the process and in a few minutes had the entire section cut out.  Also found an abandoned paperwasp nest but I left it in place.  I thought maybe the sight of it would scare any other bugs away.

Speaking of bugs.... now I have this huge hole in the side of my house where anything could get in .... ants, bugs, birds, squirrels, etc.  I won't be able to get the soffit material until at least tomorrow so I used some screening that Valerie left behind (thank goodness!) to cover the hole.  I was going to do that anyway as even after the soffits go in I don't want anything to be able to crawl in there.

The hole is 8" wide so I felt a strip of screen 12" wide would be more than sufficient.  Since I wanted to do it in one piece which would be 18 ft. long, I came up with what I thought was a brilliant way to make the strip.  Instead of rolling out 18 ft of this 48" side screening and then somehow cutting off a strip 12" wide, here's what I did. 


I made sure the roll was wrapped tighly, then measured where 12" would be and wrapped a piece of duct tape around the roll at that point.  Then I used a hacksaw and simply cut the roll at that point.  When done I had a 20' roll of screening 12" wide!  Neat and sweeeeeet!.

Next I began stapling it up to cover the hole, working from left to right, making sure I folded the screening over double where I'd be stapling.  It wasn't long before the entire venting area was bugproof.  I used the same technique successfully on the other front soffit to the right of the front porch, too.


Now it was fascia time.  Oh, I forgot to tell you that the very first thing I did was to remove the gutters and scrape the existing fascia board.  I noticed that where the board meets the roof of the front porch was rotted, so it must be replaced.  Luckily there was a seam about 3ft from the rotted end of the board so that's all I'd have to replace.  I was going to replace the entire board but I'll be covering it with vinyl or aluminum fascia anyway, and the existing boards are pretty sound.

It was around 3pm but I decided it was too early to quit, so I went to Home Depot and bought a 3/4" x 5 1/2" x 8' piece of synthetic board.  I think it's called Tru Tech or something.  The Azek board is better and more expensive, but for this application the one I bought would be fine.  It cost around $19 I think.

So back at the house I set up my table saw and got to work.  It wasn't just a matter of cutting a length of board and slapping it up, because this piece had a bevel cut on top, and an angle cut to match the pitch of the porch roof that it butted up against, so I had to get those measurements first, and then cut accordingly.  This synthetic stuff cuts beautifully and I don't have to worry about it ever rotting, even if it got wet.


At this  point it was quitting time so after another half hour or so of putting stuff away I called it a day.  This was one of those jobs that took all day but it looks like you only worked for an hour or so.  Also, I got a ton of interruptions.  My neighbor from across the street walked over and was talking to me for a while, plus I got phone calls from my mother, my sister, and Diane.  Towards the end of the day another neighbor, Joe, came by to drop off a brochure on Amish built sheds and garages I was interested in, and he stayed for a while too.  I guess I've got the whole neighborhood buzzing about the sudden burst of activity at the old Skinner Johnson house!

DAY VI ~ Shiftin' Gears

First of all let me tell you that I've caught up my posts and I've actually done this work TODAY!

My day didn't start well.  I went to Caffrey's (a local pub) last night to celebrate all the work I've done so far. I only had three beers I think, but it was good to actually see other people.  Got to bed around midnight I guess. I took my laptop to bed and fired up Netflix and set it so I could watch the Pink Panther 2 w/Steve Martin.  I actually did the exact same thing the night before but fell asleep somewhere in the first half of the movie.

So what made me think this night would be any different? This time however I fell asleep during the beginning credits!  But now it gets weird.

I was awakened by a bizarre dream where I was somehow at some sort of maybe a Satanic ritual where there were two men in front of me tied to long ropes. We were in some sort of theatre or arena, and running the show was this Goth-like character.  After torturing the one guy for a few minutes he took out a knife and started stabbing him all over...... blood splashing everywhere.  Even in my dream I couldn't watch this and turned my head.  I then heard something and looked up and saw a guy come up from the floor with a chainsaw and cut the stabber in half.  At that point I IMMEDIATELY woke up, only to hear what sounded like someone breaking into my house, which is another story.  With all this going on I couldn't sleep and checked the time.  It was 5:30am. 

So what does this have to do with painting my house?  Well, the good thing is that it woke me up early so I got up, got dressed and started my day!


Today we move to the "right" side of the house (facing the front).  This side faces the main road so it is important to get this side looking good. As you can see I have my little painting table/workstation set up, the side has been washed, and I'm ready to go. 


The trim boards that go up the roof line are in horrible shape so I spent a bunch of time scraping them.  I also washed them but will not paint them today, as they seemed to stay damp.  I will wait until they dry thoroughly. 


This is a relatively small side but I had to turn my ladder into an extension ladder to get to do the top painting.  Also there is a pathetic gable vent louver on this wall that one of the vents has fallen out.  I have two choices here.... make and install a new slat .... OR .... (and this is brilliant)... use a portion of one of the old wooden shutters from the "wino room" window.  I took the measurements and it appears that if I cut the shutter properly, I will have a section that will slip nicely into the entire opening, but that is for a later date.

BTW, because of my near death experience earlier this morning, by the time Diane came over to help me today I had already set everything up, did some scraping, went to the Home Depot to buy new shutters for the front of the house (when I got there I realized I didn't have my wallet so I had to come home empty-handed), came back and was raking some leaves. 

After eating some pork roll, egg, and cheese sandwiches on an English Muffin she brought over, we began painting and didn't stop until it was finished ... maybe3:30pm.  She went home to clean up, and I stayed to do all the grunt work... cleaning brushes, putting crap away, etc. 

When she came back I was just cleaning the last brush.  She really wanted me to get those shutters up so we drove to the Depot and picked them up.  They really didn't have a good selection, but I felt anything was better than what I had.  They were supposed to be white, but to me looked a little beige.  After I got them outside I ripped open the clear packaging and they indeed looked white so I was happy ..... until I installed them.  they are white, but not as white as the new window trim painting I did.  It is very slight but I'm sure no one will notice but me.


After that I installed a new doorbell button (we also just bought)where formerly there was a hole I drilled when I ran the wire for it ..... three years ago.  Of course, I don't even HAVE a doorbell, but I ran the wire for one and so this is the first step.  Some of you will be pleased to know that this is a lighted doorbell button.

Oh, and I must give proper credit to Diane for raking the front of my house, and cleaning all the webs and junk in the (formerly) screened in patio.  I worked her very hard but she didn't quit.  Thanks, Di.

Well, the plan for tomorrow is to rip down the front leaders and fascia boards and replace them.  Also going to Allied Supply in Toms River to pick up the soffit materials so maybe I'll start putting that up too.  Wish me luck!

Sunday, September 19, 2010

Day V ~ 2nd coat for front

Today I repainted the front of the house, even though it actually didn't need it.  It was difficult because you couldn't see where you started and where you ended, but I persevered and got it on.  To see what it looks like just look at the house with the first coat on it. 

I do think the second coat made a slight difference, but in the interest of time I don't think I'll be second coating the rest of the house at this time as I will lose a day for each side.  After I'm finished going all the way around the house AND have done the garage I will do a second coat (if my left arm hasn't fallen off by then).

As a reminder, I repeat that these first blogs are being written after the fact and I am furiously trying to catch up so I can be writing in real time.  I think I am now only two days behind. No, now that I think of it I'm only ONE day behind.... YAY!

Day IV~ ....And The Paint Goes On.....


This is it!!! Can you believe it?  10 years and I STILL don't know what color I'm painting this place, but now I absolutely positively HAVE to decide this morning (pleasure/pain thing again!).  Luckily Diane's Mom's brother (I think) works for Benjamin Moore and gave her this color swatch sample strip thing with about 1000 different color samples in it.  Last night I picked #459 Woodland Green, but this morning  I changed my mind and went with the #466 Garden Path. (see? Procrastination comes to the rescue again!)

I wanted to use the Benny Moore brand because I've had such good luck with it.

PRO TIP!!:Painting sucks to begin with, so why double your work .... don't use cheap paint!  This includes Home Depot's Behr brand (although I think they've changed their formula recently).  The cheaper brands have less pigment so you have to put two coats on and that's double work, and as we PROs know, it's hard enough to get the first coat done!

So I looked up my local paint store (Fleck's Paint Spot) and, sure enough, they sell B. Moore so, armed with my amazing color wheel, headed there.

There was only one guy behind the counter and I was the only customer, so we had plenty of time to talk.  I told him exactly what I was doing, what kind of surface I was painting, etc, and this is what I learned.  Yes, B. Moore is good, but there is a cheaper better brand. (Notice I said "cheaper" but not "cheap").  It's called "C2".  It seems a bunch of chemists and scientists from several of the major paint companies broke away and started their OWN paint company  http://www.c2paint.com/our-products/index.php .

The paint is around $12/gallon cheaper ($31 vs $42) and this C2 company is really smart (S-M-R-T).  They have developed a color system that precisely duplicates other company's colors!  So when I wanted B Moore #466, the paint guy just punched that into the C2 paint machine and voila! The precise color came out!  I know this because I put a dab of it onto the Moore swatch and it is exactly the same.

Also, it turns out that paint store guy "Mike"'s family owns the paint store and he was nice enough to set me up with an account.  Now anything I buy is put on record and if I need more paint, I just call up and say "mix me up another gallon of what I bought the last time", and they know what it is.  Very cool.

He also said that based on what I was doing, to use the finish paint as the primer.  So instead of using primer and then topcoat, to just use the topcoat.


So, armed with the paint, the brushes, and a well scrubbed house front, the time has now come!  So I opened the can of paint, dumped it into my little yellow paint holder, and began on the left side, cutting in around the left corner post and around the window.  After that came the heavy artillery.... a pad-like device that I'd use to paint the shingles.  I was going to use as 4" brush, but I saw this thing at the Depot the other day and thought I'd give it a try.  The pad consists of a sponge, with a nylon short bristle substance that would get into and in between the little vertical ridges on the shingles.  Using a roller pan as my paint holder I dipped the pad in and began painting ..... works absolutely fabulous!

I don't know whether it's better to start at the top or the bottom, but I started at the top and worked my way down, maybe doing a section 3' wide at a time. I changed this technique several times as I went along and verified that it doesn't really matter.

PRO tip:  For God's sake get a radio or iPod!  Painting is probably one of the most boring things you will ever do in life, as it takes about .0000001 percent of your total brain power to do acceptable painting and your brain will most probably totally shut down completely unless you have some other kind of distraction.


Well, about 4 hours later the first coat was applied!  I thought that due to absorption of the paint by the shingles and the splotchy colors I was painting over, that the first coat would be uneven and blotchy.  To my surprise the color was consistent and looked great! I could actually just leave it as is, as it looks that good, but I'll do another coat tomorrow to get the color closer to what the paint swatch looks like. 

By the way, here's an interesting picture .... kind of a "before and after" both on the same picture.

PRO TIP:  I think people should paint their houses every thirty years whether it needs it or not.


Saturday, September 18, 2010

Day III ~ Finishing the porch painting

Today I cracked open the gallon of Benny Moore and painted all of the porch and corner posts.  I used the "soft Gloss" finish, which is somewhere in between semi-gloss and eggshell.  Oh, and I also washed down the house.

The siding is asbestos shingles. Many of these older shore homes used them years ago but nobody does anymore.  Can you say C-A-N-C-E-R?  Asbestos-once the wonder substance is now the scourge of the modern world.  Anyway, these shingles have probably never been painted since the were done around 1960 when the house was built.  The paint on them has mutated into many various colors... all horrible, and they are now covered with a chalky substance, as well as 50 years of dirt, grime, pollen, soot, etc.  So before painting they must be somehow cleaned.

As said previously, I bought a scrub brush that fits on the end of a broomhandle, and, after mixing up my mix of MelaMagic and water, began the thankless and boring task of hand washing each shingle.  The brush is only around 6 or 8 inches wide, so you can't do too much before having to redip the brush in the suds and continuing, but when I was done the color of the house was now a fairly consistent greenish color.  The MelaMixture washes off nicely and I was left with a perfectly clean surface on which to paint.  Note that these shingles are like mini sponges, and are super absorbent, so the first coat of paint will surely be sucked up pretty quickly.

We'll know tomorrow when the first coat goes on!!!!!!

What's this stick with all the hairs sticking out of it?

After scouring the internet I learned that this stick thing was in fact.. a paint brush!.  Gee, haven't seen one of those in a while.
Seriously, today I get to use the new paint brushes I bought yesterday.  And I remind you that I am still writing "in the past". In real time actually today I will be putting on the 2nd coat of paint on the front of the house, but for the purposes of this post, "today" is actually about three days ago.

Today's miniproject is to put a primer coat on all the white parts of the porch and corner posts of the house.  To do this I purchased a gallon of Zinnser 1-2-3 interior/exterior primer.  This stuff is fantastic.  In fact, the paint lady at Home Depot said one of the people that works there actually used it to paint the tiles in her bathroom.  Then she repainted the tiles!  This primer does two things: it really adheres to the surface you put it on (including skin!) and it gives the 2nd coat of whatever you're covering it with a good clean surface to adhere to.  It also locks in any stains, etc. so they won't bleed through your final coat.

The painting went well.  So well that I probably could just leave the primer on and not even recoat it, but when I do something I like to do it the right way, so I also bought a gallon of Benjamin Moore white paint for the final coat.  This stuff is expensive ($42 a gallon I think), but does a great job.  We used it in Florida and were very happy with it.


Can you tell which side I painted and which side isn't?  If you said the left, you are correct.  Proceed to GO and pay yourself $200.  BTW I only stopped painting to take this dramatic picture.  I then completed painting the front.  Again, this is just primer...... 2nd coat of Benny Moore Expensivo paint comes tomorrow!

THE HARDEST THING YOU'LL EVER DO .... STARTING YOUR PROJECT!

It began just like any other day.... with one exception~I was actually going to get something done! I knew when I woke up that - this was the day that I'd take the first step.  I think it's the old pleasure/pain thing.... just like studying for a test at school~~~the pleasure of not doing something is better than the pain of doing something (studying, mowing the lawn, paying a bill, etc.)

That works just great..... until now it's the night before the test, or due date of the bill.  Now the pain of failing the test or paying the overdue fine EXCEEDS the pleasure of not studying or writing the check, so you are now motivated to get it done.  Works for me!

So, with that being said, I got up at the crack of 9am, had my coffee, jerked around the house, did my "planning", went to Home Depot, and bought some things that I would need, like a scrub brush I could put on a broom handle, some wood putty, an expensive 3" slant tip brush, and a 1 1/2" slant tip (trim) brush.  BTW any moron can paint in the middle of something, but for doing the "cut-in" work - you know, like where the wall meets the molding, or trim work, BUY A GOOD BRUSH!! Do NOT skimp here. With a good brush you don't even have to tape up anything.  First though, we PROs have to be properly nourished, so luckily there is a Wendy's conveniently just across the street from the Depot.

Well, before you knew it it was probably 2pm and I was back home and raring to go!

First thing I did was prepare the house for scrubdown.  OH! I should tell you this.  My original plan was to start on my detached garage and "experiment" with that. Get that done, then move on to the back of my house.  Then, armed with all this experience, finally move on to the front of the house for the ending. Come on, be real ... how much "experience" do you really need to dip a brush into some soapy water (actually MelaMagic and water) and scrub shingles.

Just before starting, though, a stroke of brilliance made me change my plan.   I decided to start on the FRONT of the house first!. See? That's where procrastination was actually a benefit!  If I had just "rushed" into this, maybe the back of the garage might be done but not the most focal point of the house. This way, in case something drastic should happen to me (like quitting this project! or an invite to go down to Florida again, or an airshow someplace) at least the front of the house would be beautified.  I suggest this to all of you PROs who in the very back of their minds think that they might not finish something ..... DO THE MOST VISIBLE PART OF THE PROJECT FIRST!

But the trick to pull this off is to finish that part - or at least make it appear finished.  Classic example would be:  lets say company's a comin'.  OMG! I have to straighten the bedroom! So what do you do? The "normal' person would take five minutes to put everything on the dresser top away where it belongs and properly make the bed.  But what does the PRO (crastinator) do? Open the top drawer of the dresser and scoop everything off the dresser top into that drawer.  And making the bed? Who's got that kind of time? So you just flatten it out and throw the bedspread over the top of it, and voila! It appears made nice and neatly.  (I must give credit where credit is due. I learned that trick from daughter Valerie many years ago.)

Total time saved?  NONE.  Because although you saved in the short term, you STILL have to put away all the stuff you scooped into the dresser drawer and properly make the bed, but the good thing is that you can always "do it later". 

PRO tip:  Commit that term to memory as you will use it often and will help you to justify anything you procrastinate about.  Repeat after me.... "Don't worry, I can always DO IT LATER."

So, with all tools necessary I plunged into my work.  My house is a small Cape Cod type, so the front of the house is relatively low .... easily reached with just a small ladder.  I removed the gutter downspouts and shutters from  the windows of (what my daughter calls) the "wino room".
I decided to paint the front porch trim first.  I scraped all day - for us PROs that's from around 2pm to 6pm.  The paint was peeling off anyway but still needed scraping.  I used a 3 inch putty knife that I sharped the edge on a grinder and it worked really well.  After that, a wire brush was used to kind of roughen up the surface on the remaining paint to give the new paint something to bite into, and then finished off with some sandpaper.


Now I had some holes in the front columns from where the old railings were attached, as well as a rough surface from where the paint was scraped off.  To make a smoother surface I used some Elmer's Wood Putty.  It's kind of like orangy beige spackle, and tools nicely.

Well, I did it!  I actually got something accomplished today! 

PRO warning:  Now that you've actually started your project you must work as quickly as possible, as the pleasure of starting will eventually be overtaken by the pain of continuing!!

Tomorrow ~painting begins!